几乎每个安卓的应用都是通过界面控件于用户交互的,安卓提供了非常丰富的界面控件
一、简单控件的使用
1.TextView控件
以下是 TextView的一些常用属性及其示例参数:
| 属性名 | 参数类型 | 可选参数举例 | 作用描述 |
|---|---|---|---|
| text | CharSequence | "Hello, World!" | 设置显示的文本内容 |
| textColor | ColorStateList | Color.RED | 设置文本颜色 |
| textSize | float | 18sp | 设置文本大小 |
| fontFamily | Typeface | Typeface.create("sans-serif-medium") | 设置字体样式 |
| gravity | int | Gravity.CENTER | 设置文本对齐方式 |
| ellipsize | TextUtils.TruncateAt | TextUtils.TruncateAt.END | 当文本过长超出TextView时的处理方式 |
| maxLines | int | 2 | 设置最大行数 |
| singleLine | boolean | true | 设置为单行模式 |
| inputType | int | InputType.TYPE_CLASS_TEXT | 指定输入类型(针对EditText) |
| hint | CharSequence | "请输入您的姓名" | 设置提示文本(针对EditText) |
| autoLink | boolean | true | 自动识别并链接URL和电话号码 |
| linksClickable | boolean | false | 控制点击链接是否打开浏览器 |
| editable | boolean | true | 设置文本是否可编辑(针对EditText) |
| selectAllOnFocus | boolean | true | 焦点聚焦时是否全选文本(针对EditText) |
| scrollHorizontally | boolean | true | 横向滚动文本 |
| marqueeRepeatLimit | int | 5 | 跑马灯重复次数 |
| selectedTextColor | ColorStateList | Color.MAGENTA | 被选中文本的颜色 |
| movementMethod | MovementMethod | new MarqueeMovement() | 设置滚动方式(用于跑马灯效果) |
| background | Drawable | getResources().getDrawable(R.drawable.bg) | 设置背景图片 |
| padding | int | 10dp | 内边距 |
| margin | int | 8dp | 外边距 |
| lineSpacingExtra | float | 2f | 行间距 |
| includeFontPadding | boolean | false | 是否包含字体内边距 |
| breakStrategy | BreakStrategy | BreakStrategy.SIMPLE | 换行策略 |
| visibility | int | View.VISIBLE | 控件可见性 |
请注意,一些属性如 inputType, gravity, ellipsize, 和 movementMethod等主要适用于 EditText或特定场景下的 TextView。对于普通 TextView而言,可能不会使用到这些属性。而且,TextView的属性可能根据不同的Android版本有细微差别,所以建议查阅最新的官方文档以获取最准确的信息。
测试代码:
<?xml version="1.0" encoding="utf-8"?>
<LinearLayout xmlns:android="http://schemas.android.com/apk/res/android"
    xmlns:app="http://schemas.android.com/apk/res-auto"
    xmlns:tools="http://schemas.android.com/tools"
    android:id="@+id/main"
    android:layout_width="match_parent"
    android:layout_height="match_parent"
    tools:context=".MainActivity">

    <TextView
        android:id="@+id/textView"
        android:layout_width="wrap_content"
        android:layout_height="wrap_content"
        android:gravity="center"
        android:ellipsize="marquee"
        android:text="@string/fight"
        android:textSize="18sp"
        android:textStyle="bold" />

</LinearLayout>
2.EditText控件
EditText 是 Android 开发中用于输入文本的一个控件,它继承自 TextView,因此具有所有 TextView 的属性。不过,EditText 还提供了一些额外的属性,以便更好地处理用户输入。以下是 EditText 的一些常用特有属性及其参数的表格:
| 属性名 | 功能描述 | 可能的值或参数 |
|---|---|---|
hint |
设置 EditText 中的提示文字 | 字符串资源引用或字符串 |
inputType |
指定 EditText 的输入类型 | 如 text, textEmailAddress, number, 等 |
maxLength |
设置 EditText 中可输入的最大字符数量 | 整数 |
minEms |
设置 EditText 的最小宽度(以em为单位) | 整数 |
maxEms |
设置 EditText 的最大宽度(以em为单位) | 整数 |
lines |
设置 EditText 显示的行数 | 整数 |
gravity |
设置 EditText 中内容的对齐方式 | 如 top, bottom, center_vertical, 等 |
textSize |
设置 EditText 的文本大小 | 像素值或sp(尺度独立像素) |
selectAllOnFocus |
确定在 EditText 获取焦点时是否选择所有文本 | 布尔值(true 或 false) |
password |
设置 EditText 是否显示密码样式 | 布尔值(true 或 false) |
singleLine |
设置 EditText 是否为单行输入 | 布尔值(true 或 false) |
ellipsize |
当文本超出 EditText 边界时的省略方式 | 如 end, marquee, middle, 等 |
imeOptions |
指定输入法选项 | 如 actionNext, actionDone, actionSearch, 等 |
filters |
设置文本过滤器 | 例如 InputFilter 实例或数组 |
capitalize |
控制 EditText 中字母大写的方式 | 如 none, sentences, words, characters |
autoLink |
自动识别并高亮显示 URL, Email 地址等 | 布尔值(true 或 false) |
autoText |
自动补全文本 | 布尔值(true 或 false) |
cursorVisible |
控制光标是否可见 | 布尔值(true 或 false) |
numeric |
指定 EditText 只接受数字输入 | 布尔值(true 或 false) |
phoneNumber |
指定 EditText 接受电话号码格式的输入 | 布尔值(true 或 false) |
ems |
设置 EditText 宽度的 em 单位 | 浮点数 |
scrollHorizontally |
使内容在水平方向滚动 | 布尔值(true 或 false) |
imeActionLabel |
自定义 IME(输入法编辑器)的动作标签 | 字符串 |
privateImeOptions |
设置私有 IME 选项 | 字符串数组 |
breakStrategy |
设置如何处理长单词的换行 | 如 simple, high_quality, balanced |
请注意,这些属性可以在布局文件中声明,也可以通过代码动态设置。使用这些属性可以帮助开发者创建符合特定需求的输入框,提高用户体验。
测试代码:
<?xml version="1.0" encoding="utf-8"?>
<LinearLayout xmlns:android="http://schemas.android.com/apk/res/android"
    android:layout_width="match_parent"
    android:layout_height="match_parent"
    android:orientation="vertical">

    <TextView
        android:layout_width="match_parent"
        android:layout_height="wrap_content"
        android:textSize="30sp"
        android:text="用户名:"
        android:id="@+id/main"
        />
    <EditText
        android:layout_width="200dp"
        android:layout_height="wrap_content"
        android:hint="请输入你的用户名"
        android:paddingTop="10dp"
        android:maxLength="10"
        android:textSize="20sp"/>
    <TextView
        android:layout_width="match_parent"
        android:layout_height="wrap_content"
        android:textSize="30sp"
        android:text="密码:"
        />
    <EditText
        android:layout_width="200dp"
        android:layout_height="wrap_content"
        android:hint="请输入你的密码"
        android:maxLength="8"
        android:paddingTop="10dp"
        android:textSize="20sp"
        android:password="true"/>
</LinearLayout>
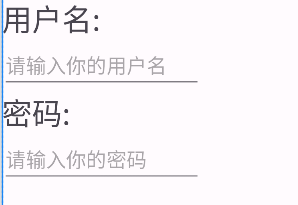
运行结果:
3.Bottun控件
在Android开发中,Button控件是用于触发某些操作的用户界面元素。虽然 Button继承自 TextView,但除了 TextView的属性外,它还有一些特定于交互的属性。以下是 Button控件的一些常用特有属性及其参数的表格:
| 属性名 | 功能描述 | 可能的值或参数 |
|---|---|---|
android:onClick |
指定当按钮被点击时要调用的方法名 | 方法名,通常指向在Activity中定义的一个方法 |
android:enabled |
设置按钮是否可用 | 布尔值(true 或 false),默认为 true |
android:focusable |
设置按钮是否可以获得焦点 | 布尔值(true 或 false),默认为 true |
android:focusableInTouchMode |
设置在触摸模式下按钮是否可以获得焦点 | 布尔值(true 或 false),默认为 true |
android:clickable |
设置按钮是否可以被点击 | 布尔值(true 或 false),默认为 true |
android:longClickable |
设置按钮是否可以响应长按事件 | 布尔值(true 或 false),默认为 false |
android:elevation |
设置按钮的海拔高度(Z轴上的阴影) | 浮点数,单位为像素 |
android:translationZ |
设置按钮在Z轴上的不透明度 | 浮点数,单位为像素 |
android:background |
设置按钮的背景 | 颜色、渐变、形状、图片资源等 |
android:minWidth |
设置按钮的最小宽度 | 整数或维度资源引用 |
android:minHeight |
设置按钮的最小高度 | 整数或维度资源引用 |
android:padding |
设置按钮内部的填充空间 | 整数或维度资源引用 |
android:margins |
设置按钮周围的外边距 | 整数、维度资源引用或方向依赖的边距 |
android:gravity |
设置按钮内容(如文本和图标)的对齐方式 | 如 top, bottom, center_vertical, 等 |
android:textSize |
设置按钮的文本大小 | 像素值或sp(尺度独立像素) |
android:textColor |
设置按钮的文本颜色 | 颜色资源或颜色代码 |
android:textStyle |
设置按钮文本的样式 | 正常、粗体、斜体等 |
android:singleLine |
设置按钮是否为单行显示 | 布尔值(true 或 false),默认为 true |
android:ellipsize |
当文本超出按钮边界时的省略方式 | 如 end, marquee, middle, 等 |
android:lines |
设置按钮显示的行数 | 整数 |
android:includeFontPadding |
是否包括字体内边距 | 布尔值(true 或 false),默认为 true |
android:duplicateParentState |
设置是否复制父视图的状态 | 布尔值(true 或 false),默认为 false |
android:drawablePadding |
设置绘制内容与按钮边界之间的间距 | 整数或维度资源引用 |
android:drawableTint |
设置按钮上Drawable资源的着色 | 颜色资源或颜色代码 |
android:drawableTintMode |
设置按钮上Drawable资源的着色模式 | 如 src_over, multiply, screen, 等 |
Button控件最重要的作用就是响应用户的一系列点击事件,Button控件有三种控件设置点击事件的方法
1️⃣ 直接通过布局文件来指定 onClick属性,这种方法还需要在 Activity类中来创建相应的响应方法
    <Button
        android:onClick="click"
        />
在 Activity类中来创建相应的响应方法,需要使用到 Toast类,这个我后面应该会提到
public class MainActivity extends AppCompatActivity{
    private Button btn_two; //创建Button变量
    @Override
    protected void onCreate(Bundle savedInstanceState) {
        super.onCreate(savedInstanceState);
        EdgeToEdge.enable(this);
        setContentView(R.layout.activity_main);
        btn_two = findViewById(R.id.btn_two); //获取到Button控件
    }
    //第一种方法 需要在xml文件中设置onClik
    public void click(View view){ //注意是在onCreate外创建一个类
        btn_two.setText("Button2已经被点击");
     }
2️⃣ 第二种方法 是通过匿名内部类的方式为 Button控件设置点击事件
public class MainActivity extends AppCompatActivity  {
    private Button btn_one; //创建Button变量
    @Override
    protected void onCreate(Bundle savedInstanceState) {
        super.onCreate(savedInstanceState);
        EdgeToEdge.enable(this);
        setContentView(R.layout.activity_main);
        btn_one = findViewById(R.id.btn_one); //获取到Button控件
        //第二种方法 是在onCreate内
        btn_one.setOnClickListener(new View.OnClickListener() {
           @Override
           public void onClick(View view){
                btn_one.setText("Button1已经被点击");
           }
        });
    }
设置 setOnClickListener方法实现对Button控件点击事件的监听,它所传递的参数是一个匿名的内部类。如果监听到Button控件被点击,那么程序就会调用匿名内部类中的 onClick方法实现 Button控件的点击事件
3️⃣ 使用当前 Activity实现 View.OnClickListener接口,也可以为Button控件设置点击事件
public class MainActivity extends AppCompatActivity implements View.OnClickListener {
    private Button btn_three; //创建Button变量
    @Override
    protected void onCreate(Bundle savedInstanceState) {
        super.onCreate(savedInstanceState);
        EdgeToEdge.enable(this);
        setContentView(R.layout.activity_main);
        btn_three = findViewById(R.id.btn_three); //获取到Button控件
		btn_three.setOnClickListener(this); //设置监听事件
    }
    //第三种
    @Override
    public void onClick(View v) {
        switch (v.getId()) {
//            case R.id.btn_one:
//                btn_one.setText("Button1已经被点击");
//                break;
//            case R.id.btn_two:
//                btn_two.setText("Button2已经被点击");
//                break;
            case R.id.btn_three:
                btn_three.setText("Button3  已经被点击");
                break;

        }
    }
直接通过调用接口中的 onClick方法来设置点击事件,在调用onClick方法生效之前,需要使用获取到的Button控件的**setOnClickListener**来设置监听事件
⭐️ 一般情况下使用最多的是第三种,因为它可以快速的设置多个 Button控件
整体代码(注意看)
activitt_main.xml文件设置
<?xml version="1.0" encoding="utf-8"?>
<LinearLayout xmlns:android="http://schemas.android.com/apk/res/android"
    android:layout_width="match_parent"
    android:layout_height="match_parent"
    android:orientation="vertical"
    android:padding="40dp">
    <Button
        android:id = "@+id/btn_one"
        android:text="Button1"
        android:layout_width="match_parent"
        android:layout_height="wrap_content"
        />
    <Button
        android:id = "@+id/btn_two"
        android:text="Button2"
        android:layout_width="match_parent"
        android:onClick="click"
        android:layout_height="wrap_content"/>
    <Button
        android:id = "@+id/btn_three"
        android:text="Button3"
        android:layout_width="match_parent"
        android:layout_height="wrap_content"/>
</LinearLayout>
MainActivity.java
package fun.tanc.buttontest;

import android.os.Bundle;
import android.view.View;
import android.widget.Button;

import androidx.activity.EdgeToEdge;
import androidx.appcompat.app.AppCompatActivity;
import androidx.core.graphics.Insets;
import androidx.core.view.ViewCompat;
import androidx.core.view.WindowInsetsCompat;

public class MainActivity extends AppCompatActivity implements View.OnClickListener {
    private Button btn_one,btn_two,btn_three;
    @Override
    protected void onCreate(Bundle savedInstanceState) {
        super.onCreate(savedInstanceState);
        EdgeToEdge.enable(this);
        setContentView(R.layout.activity_main);
        btn_one = findViewById(R.id.btn_one);
        btn_two = findViewById(R.id.btn_two);
        btn_three = findViewById(R.id.btn_three);
        //第一种方法
        btn_one.setOnClickListener(new View.OnClickListener() {
           @Override
           public void onClick(View view){
                btn_one.setText("Button1已经被点击");
           }
        });
//        btn_two.setOnClickListener(this);v
        btn_three.setOnClickListener(this);
//        btn_three.setOnClickListener(this);
//        ViewCompat.setOnApplyWindowInsetsListener(findViewById(R.id.main), (v, insets) -> {
//            Insets systemBars = insets.getInsets(WindowInsetsCompat.Type.systemBars());
//            v.setPadding(systemBars.left, systemBars.top, systemBars.right, systemBars.bottom);
//            return insets;
//        });
    }

    //第二种需要在actitiy_main.xml文件中指定android:onClick: click
    public void click(View view){
        btn_two.setText("Button2已经被点击");
    }

    //第三种获取点击事情的方法
    @Override
    public void onClick(View v) {
        switch (v.getId()) {
//            case R.id.btn_one:
//                btn_one.setText("Button1已经被点击");
//                break;
//            case R.id.btn_two:
//                btn_two.setText("Button2已经被点击");
//                break;
            case R.id.btn_three:
                btn_three.setText("Button3  已经被点击");
                break;

        }
    }
}
4.ImageView控件
在Android开发中,ImageView是一个常用的控件,用于展示图片,它继承自 View。以下是 ImageView的一些常用属性及其参数的表格:
| 属性名 | 功能描述 | 可能的值或参数 |
|---|---|---|
android:src |
设置要在 ImageView中显示的图片 |
图片资源ID、图片资源文件路径、颜色资源等 |
android:scaleType |
设置图片的缩放类型 | center, fitCenter, fitStart, fitEnd, centerCrop, fitXY, matrix 等 |
android:alpha |
设置图片的透明度 | 浮点数,范围从0(完全透明)到1(完全不透明) |
android:rotation |
设置图片的旋转角度 | 浮点数,单位为度 |
android:layout_width |
设置 ImageView的宽度 |
wrap_content、固定尺寸(如 100dp)、match_parent等 |
android:layout_height |
设置 ImageView的高度 |
wrap_content、固定尺寸(如 100dp)、match_parent等 |
android:maxWidth |
设置 ImageView的最大宽度 |
数值或维度资源引用 |
android:maxHeight |
设置 ImageView的最大高度 |
数值或维度资源引用 |
android:minWidth |
设置 ImageView的最小宽度 |
数值或维度资源引用 |
android:minHeight |
设置 ImageView的最小高度 |
数值或维度资源引用 |
android:padding |
设置 ImageView内部的填充空间 |
数值或维度资源引用 |
android:cropToPadding |
设置是否在图片周围添加内边距后裁剪图片 | 布尔值(true 或 false),默认为 false |
android:adjustViewBounds |
设置是否根据图片的实际大小调整 ImageView的边界 |
布尔值(true 或 false),默认为 false |
android:contentDescription |
设置图片的内容描述,用于无障碍服务 | 字符串资源引用或字符串 |
android:background |
设置 ImageView的背景 |
颜色资源、图片资源等 |
android:tint |
设置图片的着色 | 颜色资源或颜色代码 |
android:tintMode |
设置图片着色的混合模式 | 如 src_over, multiply, screen, 等 |
实现代码
<?xml version="1.0" encoding="utf-8"?>
<LinearLayout xmlns:android="http://schemas.android.com/apk/res/android"
    android:layout_width="match_parent"
    android:layout_height="match_parent"
    android:orientation="vertical"
    >
    <ImageView
        android:layout_width="wrap_content"
        android:layout_height="wrap_content"
        android:src="@drawable/cake"
        android:contentDescription="这是一个蛋糕"
        />
</LinearLayout>
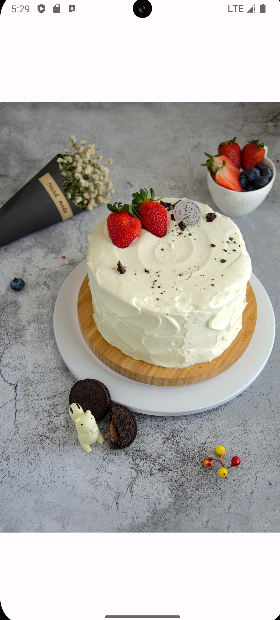
效果图
5.RadioButton和CheckBox控件
在Android开发中,RadioButton和 CheckBox是用于用户输入的两种常见控件。RadioButton通常用于在一组选项中选择一个选项,而 CheckBox允许用户从列表中选择多个选项。以下是 RadioButton和 CheckBox的一些常用属性及其参数的表格:
| 属性名 | 功能描述 | 可能的值或参数 |
|---|---|---|
android:id |
为控件设置唯一的ID | 字符串资源引用或字符串 |
android:text |
设置控件显示的文本 | 字符串资源引用或字符串 |
android:checked |
设置控件默认是否被选中 | 布尔值(true 或 false),默认为 false |
android:layout_width |
设置控件的宽度 | wrap_content、固定尺寸(如 100dp)、match_parent等 |
android:layout_height |
设置控件的高度 | wrap_content、固定尺寸(如 100dp)、match_parent等 |
android:button |
设置RadioButton或CheckBox的按钮样式 | 内部属性,通常不直接设置 |
android:gravity |
设置控件内容的对齐方式 | 如 top, bottom, center_vertical, 等 |
android:textSize |
设置控件的文本大小 | 像素值或sp(尺度独立像素) |
android:textColor |
设置控件的文本颜色 | 颜色资源或颜色代码 |
android:textStyle |
设置控件文本的样式 | 正常、粗体、斜体等 |
android:padding |
设置控件内部的填充空间 | 数值或维度资源引用 |
android:margins |
设置控件周围的外边距 | 数值或维度资源引用 |
android:drawablePadding |
设置绘制内容与控件边界之间的间距 | 数值或维度资源引用 |
android:drawableTint |
设置控件上Drawable资源的着色 | 颜色资源或颜色代码 |
android:drawableTintMode |
设置控件上Drawable资源的着色模式 | 如 src_over, multiply, screen, 等 |
android:background |
设置控件的背景 | 颜色、渐变、形状、图片等资源 |
RaidoButton控件表示单选按钮 CheckBox多选按钮,他们都有未选中和选择两个状态,通过 checked 属性指定,当可选值为 true时,表示选中状态,false表示未选择状态
1️⃣ RadioButton通常搭配 RadioGroup配合使用,实现多个按钮来单选的功能,从而杜绝多个单选按钮同时选中
<?xml version="1.0" encoding="utf-8"?>
<LinearLayout xmlns:android="http://schemas.android.com/apk/res/android"
    android:layout_height="match_parent"
    android:layout_width="match_parent"
    android:orientation="vertical"
    android:id="@+id/main">
    <TextView
        android:layout_width="wrap_content"
        android:layout_height="wrap_content"
        android:textSize="21sp"
        android:text="请选择你的性别:"/>
    <RadioGroup
        android:layout_width="wrap_content"
        android:layout_height="wrap_content">
        <RadioButton
            android:id="@+id/btn_male"
            android:layout_width="wrap_content"
            android:layout_height="wrap_content"
            android:text="男"
            android:textSize="20sp"/>
        <RadioButton
            android:id="@+id/female"
            android:layout_width="wrap_content"
            android:layout_height="wrap_content"
            android:text="女"
            android:textSize="20sp"/>

    </RadioGroup>
</LinearLayout>

也可以设置点击事件这里需要使用到 setOnCheckedChangeListener来监听 RadioGroup控件
package fun.tanc.radiobutton;

import android.os.Bundle;
import android.widget.RadioGroup;
import android.widget.TextView;

import androidx.activity.EdgeToEdge;
import androidx.appcompat.app.AppCompatActivity;

public class MainActivity extends AppCompatActivity {
    //定义获取到的控件名
    private RadioGroup btn;I
    private TextView text;
    @Override
    protected void onCreate(Bundle savedInstanceState) {
        super.onCreate(savedInstanceState);
        EdgeToEdge.enable(this);
        setContentView(R.layout.activity_main);
     I   //获取控件
        btn=findViewById(R.id.btn_sex)
        text=findViewById(R.id.btn_display);
        //监听RadioGroup控件
        btn.setOnCheckedChangeListener(new RadioGroup.OnCheckedChangeListener() {
            @Override
            public void onCheckedChanged(RadioGroup group, int checkedId) {
                //选择选入的控件ID
                if(checkedId == R.id.btn_male){
                    text.setText("您当前选择的性别为: 男");
                }else {
                    text.setText("您当前选择的性别为: 女");
                }
            }
        });
    }

}
xml代码
<?xml version="1.0" encoding="utf-8"?>
<LinearLayout xmlns:android="http://schemas.android.com/apk/res/android"
    android:layout_height="match_parent"
    android:layout_width="match_parent"
    android:orientation="vertical"
    android:id="@+id/main"
    android:paddingTop="40dp">
    <TextView
        android:layout_width="wrap_content"
        android:layout_height="wrap_content"
        android:textSize="21sp"
        android:text="请选择你的性别:"/>
    <RadioGroup
        android:id="@+id/btn_sex"
        android:layout_width="wrap_content"
        android:layout_height="wrap_content">
        <RadioButton
            android:id="@+id/btn_male"
            android:layout_width="wrap_content"
            android:layout_height="wrap_content"
            android:text="男"
            android:textSize="20sp"/>
        <RadioButton
            android:id="@+id/btn_female"
            android:layout_width="wrap_content"
            android:layout_height="wrap_content"
            android:text="女"
            android:textSize="20sp"/>

    </RadioGroup>
    <TextView
        android:id="@+id/btn_display"
        android:layout_width="wrap_content"
        android:layout_height="wrap_content"
        android:text="您还未选择性别"
        android:textSize="20sp"
        />
</LinearLayout>
2️⃣ CheckBox由于时复选框,本身就要支持多选,就不需要 Goup
<?xml version="1.0" encoding="utf-8"?>
<LinearLayout xmlns:android="http://schemas.android.com/apk/res/android"
    android:layout_width="match_parent"
    android:layout_height="match_parent"
    android:orientation="vertical"
    android:id="@+id/main" >
    <TextView
        android:layout_width="wrap_content"
        android:layout_height="wrap_content"
        android:text="选择你喜爱的兴趣:"
        android:textSize="20sp"/>
    <CheckBox
        android:layout_width="wrap_content"
        android:layout_height="wrap_content"
        android:text="Basketball"
        android:textSize="19sp"/>
    <CheckBox
        android:layout_width="wrap_content"
        android:layout_height="wrap_content"
        android:text="Badminton"
        android:textSize="19sp"/>
    <CheckBox
        android:layout_width="wrap_content"
        android:layout_height="wrap_content"
        android:text="Football"
        android:textSize="19sp"/>
</LinearLayout>
同样 CheckBox也支持按钮事件监控
将 xml文件的控件添加一个 Text,和 id,最后一个 Text控件未设置显示,是因为可以在 java代码中需要判断是否点击,如果点击了才显示点击了的控件
<?xml version="1.0" encoding="utf-8"?>
<LinearLayout xmlns:android="http://schemas.android.com/apk/res/android"
    android:layout_width="match_parent"
    android:layout_height="match_parent"
    android:orientation="vertical"
    android:id="@+id/main"  >
    <TextView
        android:layout_width="wrap_content"
        android:layout_height="wrap_content"
        android:text="选择你喜爱的兴趣:"
        android:textSize="20sp"
        />
    <CheckBox
        android:id="@+id/basketball"
        android:layout_width="wrap_content"
        android:layout_height="wrap_content"
        android:text="Basketball"
        android:textSize="19sp"/>
    <CheckBox
        android:id="@+id/badminton"
        android:layout_width="wrap_content"
        android:layout_height="wrap_content"
        android:text="Badminton"
        android:textSize="19sp"/>
    <CheckBox
        android:id="@+id/football"
        android:layout_width="wrap_content"
        android:layout_height="wrap_content"
        android:text="Football"
        android:textSize="19sp"/>
    <TextView
        android:layout_width="wrap_content"
        android:layout_height="wrap_content"
        android:text="你还未选择兴趣"
        android:textSize="20sp"
        />
    <TextView
        android:id="@+id/hobby"
        android:layout_width="wrap_content"
        android:layout_height="wrap_content"
        android:textSize="20sp"
        />
</LinearLayout>
MainActivity代码,这段代码逻辑
1.定义需要获取的控件变量和需要存储数据的变量和,连接 CompoundButton.OnCheckedChangeListener接口
2.创建存储数据的 String对象
3.使用在 XML文件的id获取控制变量
4.然后使用 setOnCheckedChangeListener来监听控件
5.创建 onCheckedChanged方法用于判断,其中 buttonView为点击的控件信息,isChecked为检测是否点击控件
6.判断逻辑为,开始 hobbys中的数据肯定为空,如果用户选择了控件,那么 data中保存的 buttonView被点击控件的数据,如果用户点击了数据,那么就将 data和 hobbys连接,也就是的到 data的信息,然后输出到控件中,如果没有选中,就会去判断里面有没有残留的 data的数据,有就用空格子替换
package fun.tanc.checkbox;

import android.os.Bundle;
import android.widget.CheckBox;
import android.widget.CompoundButton;
import android.widget.TextView;

import androidx.activity.EdgeToEdge;
import androidx.appcompat.app.AppCompatActivity;
import androidx.core.graphics.Insets;
import androidx.core.view.ViewCompat;
import androidx.core.view.WindowInsetsCompat;

public class MainActivity extends AppCompatActivity implements CompoundButton.OnCheckedChangeListener {
    //定义定义需要获取的控件变量
    private String hobbys;
    private TextView hobby;
    private CheckBox basketball,football,badminton;
    @Override
    protected void onCreate(Bundle savedInstanceState) {
        super.onCreate(savedInstanceState);
        EdgeToEdge.enable(this);
        setContentView(R.layout.activity_main);
        //创建存放兴趣的字符串类型
        hobbys = new String();
        //获取控件变量
        basketball = findViewById(R.id.basketball);
        football = findViewById(R.id.football);
        badminton = findViewById(R.id.badminton);
        hobby  = findViewById(R.id.hobby);
        //使用setOnCheckedChangeListener监听控件
        basketball.setOnCheckedChangeListener(this);
        football.setOnCheckedChangeListener(this);
        badminton.setOnCheckedChangeListener(this);
    }

    @Override
    public void onCheckedChanged(CompoundButton buttonView, boolean isChecked) {
        //创建存放被点击控件Text的字符串类型
        String data = buttonView.getText().toString();
        //判断是否被点击
        if(isChecked){
            if(!hobbys.contains(data)){
                hobbys = hobbys+data;
                hobby.setText(hobbys);
            }
        }else {
            if(hobbys.contains(data)){
                hobbys  = hobbys.replace(data,"");
                hobby.setText(hobbys);
            }
        }
    }
}
6.Toast类
Toast是 Android的一个轻量级信息提醒机制,用于向用户提示即时消息,它显示在应用程序的最上层,显示一段时间就会自动消失,也不会打断当前的操作,也不会获得焦点
Toast类的 makeText()方法有三个参数,具体如下:
- 上下文环境(Context):这个参数指的是应用程序的当前上下文,通常是通过
this或者getApplicationContext()来获取。上下文环境是用于确定Toast与哪个界面关联。 - 要显示的消息字符串(CharSequence):这是你想要在Toast中展示给用户的文本内容。它可以是一个直接的字符串字面量,也可以是定义在资源文件
strings.xml中的字符串资源ID。** - 显示持续时间(int):这个参数决定了Toast消息显示的时间长短。可以选择使用
Toast类提供的两个常量LENGTH_LONG和LENGTH_SHORT,分别对应长时间和短时间显示,或者自定义以毫秒为单位的具体时间长度。
此外,调用完 makeText()方法后通常需要调用 show()方法来实际显示Toast消息。
代码示例,这段代码实现了一个 button控件被点击后,使用 Toast类来提示消息
xml代码
<?xml version="1.0" encoding="utf-8"?>
<LinearLayout xmlns:android="http://schemas.android.com/apk/res/android"
    android:layout_height="match_parent"
    android:layout_width="match_parent"
    android:id="@+id/main"
    android:orientation="vertical"
    android:paddingTop="40dp">
    <Button
        android:id="@+id/btn"
        android:layout_width="match_parent"
        android:layout_height="wrap_content"
        android:text="Button"
        android:onClick="click"/>
</LinearLayout>
java代码
package fun.tanc.toasttest;

import android.os.Bundle;
import android.view.View;
import android.widget.Button;
import android.widget.Toast;

import androidx.activity.EdgeToEdge;
import androidx.appcompat.app.AppCompatActivity;
import androidx.core.graphics.Insets;
import androidx.core.view.ViewCompat;
import androidx.core.view.WindowInsetsCompat;

public class MainActivity extends AppCompatActivity {
    //定义变量
    private Button btn;
    @Override
    protected void onCreate(Bundle savedInstanceState) {
        super.onCreate(savedInstanceState);
        EdgeToEdge.enable(this);
        setContentView(R.layout.activity_main);
        //获取控件
        btn = findViewById(R.id.btn);
    }
    public void click(View view) {
        Toast.makeText(this,"我被点击了",Toast.LENGTH_LONG).show();
    }
}
7.简单控件综合应用
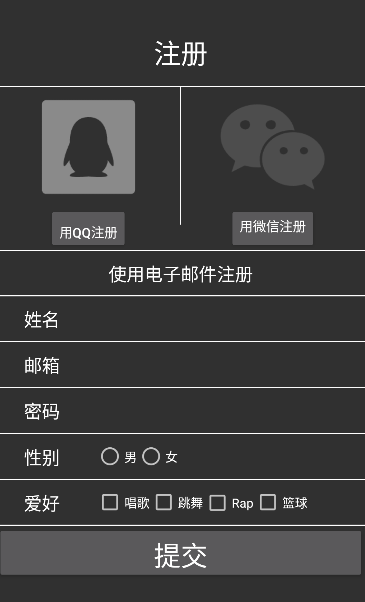
⭐️ 需求: 编写一个注册按钮,使用到以上的控件
基础样式
1.首先修改一下 AndrodManifes.xml的文件将默认的主题修改
android:theme="@style/Theme.AppCompat.NoActionBar"
2.编写 xml布局文档之前,可以看到需要使用到多个相同属性的 TextView和 EditText,两个图片可以使用 Button的背景图片或者 ImgeView控件查看,还需要使用到 RadioButton和 Checkbox,可以直接在 theme.xml中统一设置一下这些控件的属性
<resources xmlns:tools="http://schemas.android.com/tools">
    <!-- Base application theme. -->
    <style name="Base.Theme.Register" parent="Theme.Material3.DayNight.NoActionBar">
        <!-- Customize your light theme here. -->
        <!-- <item name="colorPrimary">@color/my_light_primary</item> -->
    </style>

    <style name="Theme.Register" parent="Base.Theme.Register" />
<!--    分隔线条样式-->
    <style name="hLine">
        <item name="android:layout_width">match_parent</item>
        <item name="android:layout_height">1dp</item>
        <item name="android:background">@android:color/white</item>
    </style>
    <style name="vLine">
        <item name="android:layout_width">1dp</item>
        <item name="android:layout_height">153dp</item>
        <item name="android:background">@android:color/white</item>
    </style>
<!--    文本样式-->
    <style name="register_Func_txt">
        <item name="android:layout_height">wrap_content</item>
        <item name="android:layout_width">wrap_content</item>
<!--        <item name="android:layout_weight">1</item>-->
        <item name="android:gravity">center_horizontal</item>
        <item name="android:textSize">15dp</item>
        <item name="android:textColor">@android:color/white</item>
    </style>
    <style name="email_Func_txt">
        <item name="android:layout_height">50dp</item>
        <item name="android:layout_width">match_parent</item>
        <item name="android:gravity">center</item>
        <item name="android:textSize">20dp</item>
        <item name="android:textColor">@android:color/white</item>
    </style>
    <style name="other_Func_txt">
        <item name="android:layout_height">wrap_content</item>
        <item name="android:layout_width">wrap_content</item>
        <item name="android:gravity">center_horizontal</item>
        <item name="android:layout_gravity">center</item>
        <item name="android:paddingLeft">30dp</item>
        <item name="android:textSize">20dp</item>
        <item name="android:textColor">@android:color/white</item>
    </style>
    <style name="Topic_txt">
        <item name="android:layout_height">60dp</item>
        <item name="android:layout_width">match_parent</item>
        <item name="android:gravity">center_horizontal</item>
        <item name="android:textSize">30dp</item>
        <item name="android:textColor">@android:color/white</item>
    </style>
<!--输入框样式-->
    <style name="editOne">
        <item name="android:layout_height">wrap_content</item>
        <item name="android:layout_width">match_parent</item>
        <item name="android:layout_marginLeft">30dp</item>
        <item name="android:textColor">@android:color/white</item>
        <item name="android:background">@null</item>
        <item name="android:layout_gravity">center</item>
    </style>
</resources>
3.将准备的图片放入对应路径
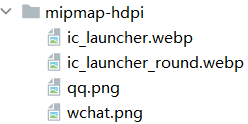
4.编写完成样式后,就可以开始设计布局文件了,布局文件我这使用的 LinearLayout中在嵌套 LinearLayout的方法
<?xml version="1.0" encoding="utf-8"?>
<LinearLayout xmlns:android="http://schemas.android.com/apk/res/android"
    android:layout_height="match_parent"
    android:layout_width="match_parent"
    android:id="@+id/main"
    android:orientation="vertical"
    android:paddingTop="40dp">
    <TextView
        android:text="注册"
        style="@style/Topic_txt" />
    <View style="@style/hLine"/>
    <LinearLayout
        android:layout_width="match_parent"
        android:layout_height="wrap_content"
        android:orientation="horizontal">
        <LinearLayout
            android:layout_width="wrap_content"
            android:layout_height="wrap_content"
            android:orientation="vertical"
            android:layout_weight="1">

            <Button
                android:layout_width="wrap_content"
                android:layout_height="wrap_content"
                android:background="@mipmap/qq"
                android:layout_gravity="center"/>

            <Button
                style="@style/register_Func_txt"
                android:gravity="bottom"
                android:text="用QQ注册"
                android:layout_gravity="center_horizontal"/>
        </LinearLayout>
        <View
            style="@style/vLine" />
        <LinearLayout
            android:layout_width="wrap_content"
            android:layout_height="wrap_content"
            android:orientation="vertical"
            android:layout_weight="1">
            <Button
                android:layout_width="wrap_content"
                android:layout_height="wrap_content"
                android:background="@mipmap/wchat"
                android:layout_gravity="center_horizontal"/>
            <Button
                style="@style/register_Func_txt"
                android:layout_gravity="center"
                android:text="用微信注册"/>
        </LinearLayout>
    </LinearLayout>
    <View style="@style/hLine"/>

    <TextView
        style="@style/email_Func_txt"
        android:layout_height="49dp"
        android:text="使用电子邮件注册" />
    <View style="@style/hLine"/>
    <LinearLayout
        android:layout_width="match_parent"
        android:layout_height="50dp"
        android:orientation="horizontal">
        <TextView
            android:text="姓名"
            style="@style/other_Func_txt"/>
        <EditText
            android:id="@+id/uName"
            style="@style/editOne"/>
    </LinearLayout>
    <View style="@style/hLine"/>
    <LinearLayout
        android:layout_width="match_parent"
        android:layout_height="50dp"
        android:orientation="horizontal"
        >
        <TextView
            android:text="邮箱"
            style="@style/other_Func_txt"/>
        <EditText
            android:id="@+id/eMail"
            style="@style/editOne"/>
    </LinearLayout>
    <View style="@style/hLine"/>
    <LinearLayout
        android:layout_width="match_parent"
        android:layout_height="50dp"
        android:orientation="horizontal">
        <TextView
            android:text="密码"
            style="@style/other_Func_txt"/>
        <EditText
            android:id="@+id/uPassword"
            style="@style/editOne"
            android:password="true"/>
    </LinearLayout>
    <View style="@style/hLine"/>
    <LinearLayout
        android:layout_width="match_parent"
        android:layout_height="50dp"
        android:orientation="horizontal">
        <TextView
            android:text="性别"
            style="@style/other_Func_txt"/>
        <RadioGroup
            android:id="@+id/sex"
            android:layout_width="match_parent"
            android:layout_height="wrap_content"
            android:orientation="horizontal"
            android:paddingLeft="40dp"
            android:layout_gravity="center">
            <RadioButton
                android:id="@+id/male"
                android:layout_width="wrap_content"
                android:layout_height="wrap_content"
                android:text="男"/>
            <RadioButton
                android:id="@+id/female"
                android:layout_width="wrap_content"
                android:layout_height="wrap_content"
                android:text="女"/>
        </RadioGroup>
    </LinearLayout>
    <View style="@style/hLine"/>
    <LinearLayout
        android:layout_width="wrap_content"
        android:layout_height="50dp">
        <TextView
            android:text="爱好"
            style="@style/other_Func_txt"/>
        <LinearLayout
            android:layout_width="wrap_content"
            android:layout_height="wrap_content"
            android:layout_gravity="center"
            android:paddingLeft="40dp">
            <CheckBox
                android:id="@+id/sing"
                android:layout_width="wrap_content"
                android:layout_height="wrap_content"
                android:text="唱歌"/>
            <CheckBox
                android:id="@+id/dance"
                android:layout_width="wrap_content"
                android:layout_height="wrap_content"
                android:text="跳舞"/>
            <CheckBox
                android:id="@+id/rap"
                android:layout_width="wrap_content"
                android:layout_height="wrap_content"
                android:text="Rap"/>
            <CheckBox
                android:id="@+id/basketball"
                android:layout_width="wrap_content"
                android:layout_height="wrap_content"
                android:text="篮球"/>
        </LinearLayout>
    </LinearLayout>
    <View style="@style/hLine"/>
    <Button
        android:id="@+id/push"
        android:text="提交"
        style="@style/Topic_txt"/>
</LinearLayout>
5.开始编写 java代码,需要设置控件监控
package fun.tanc.register;

import android.os.Bundle;
import android.text.TextUtils;
import android.util.Log;
import android.view.View;
import android.widget.Button;
import android.widget.CheckBox;
import android.widget.CompoundButton;
import android.widget.EditText;
import android.widget.RadioGroup;
import android.widget.Switch;
import android.widget.Toast;

import androidx.activity.EdgeToEdge;
import androidx.appcompat.app.AppCompatActivity;
import androidx.core.graphics.Insets;
import androidx.core.view.ViewCompat;
import androidx.core.view.WindowInsetsCompat;

public class MainActivity extends AppCompatActivity implements View.OnClickListener, CompoundButton.OnCheckedChangeListener{
    /*
    * 定义获取控件的变量
    * */
    private String name,email,pwd,sex,hobbys;
    private EditText btn_name,btn_email,btn_pwd;
    private Button btn_push;
    private RadioGroup sex_group;
    private CheckBox cb_sing,cb_rap,cb_dance,cb_basketball;

    @Override
    protected void onCreate(Bundle savedInstanceState) {
        super.onCreate(savedInstanceState);
        EdgeToEdge.enable(this);
        setContentView(R.layout.activity_main);
        //获取控件变量
        btn_name = findViewById(R.id.uName);
        btn_email = findViewById(R.id.eMail);
        btn_pwd = findViewById(R.id.uPassword);
        btn_push = findViewById(R.id.push);
        sex_group = findViewById(R.id.sex);
        cb_sing =  findViewById(R.id.sing);
        cb_rap =  findViewById(R.id.rap);
        cb_dance =  findViewById(R.id.dance);
        cb_basketball =  findViewById(R.id.basketball);
        //创建获取兴趣爱好信息字符串
        hobbys = new String();
        /**
         * 监听控件
         * */
        //监听提交按钮
        btn_push.setOnClickListener(this);
        //监听复选框
        cb_sing.setOnCheckedChangeListener(this);
        cb_dance.setOnCheckedChangeListener(this);
        cb_basketball.setOnCheckedChangeListener(this);
        cb_rap.setOnCheckedChangeListener(this);
        //监听单选框
        sex_group.setOnCheckedChangeListener(new RadioGroup.OnCheckedChangeListener() {
            @Override
            public void onCheckedChanged(RadioGroup group, int checkedId) {
                if (checkedId == R.id.male){
                    sex = "男";
                }else {
                    sex ="女";
                }
            }
        });
    }
    //获取输入的界面数据
    public void getData(){
        name = btn_name.getText().toString().trim();
        email = btn_email.getText().toString().trim();
        pwd = btn_pwd.getText().toString().trim();
    }

    //监听复选框
    @Override
    public void onCheckedChanged(CompoundButton buttonView, boolean isChecked) {
            String dataInfo = buttonView.getText().toString();
            if (isChecked){
                if(!hobbys.contains(dataInfo)){
                    hobbys = hobbys+dataInfo;
                }
            }else {
                if (hobbys.contains(dataInfo)){
                    hobbys.replace(dataInfo,"");
                }
            }
    }
    //使用onclick实现监控edit是否输入了数据如果没有数据数据则toast提示
    @Override
    public void onClick(View v) {
        if (v.getId() == R.id.push) {
            getData();
            if (TextUtils.isEmpty(name)) {
                Toast.makeText(this, "请输入名字", Toast.LENGTH_LONG).show();
            } else if (TextUtils.isEmpty(pwd)) {
                Toast.makeText(this, "请输入密码", Toast.LENGTH_LONG).show();
            } else if (TextUtils.isEmpty(email)) {
                Toast.makeText(this, "请输入邮箱地址", Toast.LENGTH_LONG).show();
            } else if (TextUtils.isEmpty(sex)) {
                Toast.makeText(this, "请选择性别", Toast.LENGTH_LONG).show();
            } else if (TextUtils.isEmpty(hobbys)) {
                Toast.makeText(this, "请选择爱好", Toast.LENGTH_LONG).show();
            } else {
                Toast.makeText(this, "注册成功", Toast.LENGTH_LONG).show();
                Log.i("INFO", "注册的用户信息为:\n" + "名字:" + name + "邮箱:" + email + "性别" + sex + "兴趣爱好" + hobbys);
            }
        }
    }
}
未完待续....

