👂 在Android应用程序中,界面是由布局和控件组成的
一、View控件
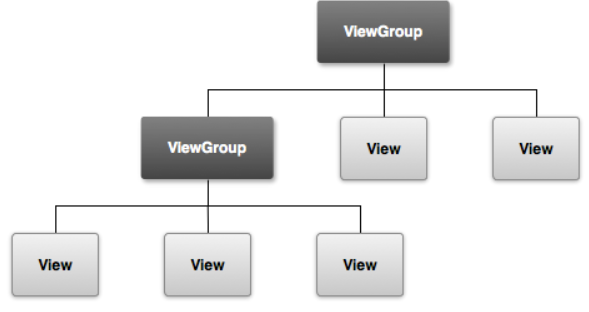
安卓所有的UI元素都是通过对View控件与ViewGroup容器构成,
ViewGroup作为容器盛装界面中的控件,它可以包含普通的View控件,也可以包含ViewGroup容器
二、界面的布局编写方法
一种是JAVA一种是XML
在java中
        RelativeLayout relative = new RelativeLayout(this); //创建RelativeLayout对象
        RelativeLayout.LayoutParams params = new RelativeLayout.LayoutParams(
                RelativeLayout.LayoutParams.WRAP_CONTENT,
                RelativeLayout.LayoutParams.WRAP_CONTENT
        ); //创建属性并配置宽和高设置为warp_content
        params.addRule(RelativeLayout.CENTER_IN_PARENT); //设置居中显示
        TextView text = new TextView(this); //创建Text控件
        text.setText("Java"); //设置字符串
        text.setTextColor(Color.RED); //字符串颜色
        text.setTextSize(18); //字符串大小
        relative.addView(text,params); //将数属性和文字控件加入到布局
        setContentView(relative); //显示布局
在xml中
<?xml version="1.0" encoding="utf-8"?>
<androidx.constraintlayout.widget.ConstraintLayout xmlns:android="http://schemas.android.com/apk/res/android"
    xmlns:app="http://schemas.android.com/apk/res-auto"
    xmlns:tools="http://schemas.android.com/tools"
    android:id="@+id/main"
    android:layout_width="match_parent"
    android:layout_height="match_parent"
    android:foreground="@mipmap/ic_launcher"
    android:theme="@style/AppTheme"
    tools:context=".MainActivity">

    <TextView
        android:layout_width="@dimen/activity_horizontal_margin"
        android:layout_height="wrap_content"
        android:text="@string/app_name"
        app:layout_constraintBottom_toBottomOf="parent"
        app:layout_constraintEnd_toEndOf="parent"
        app:layout_constraintStart_toStartOf="parent"
        app:layout_constraintTop_toTopOf="parent"
        style="@style/textViewStyle"
        />
</androidx.constraintlayout.widget.ConstraintLayout>
三、界面布局的通用属性
以下是您请求的以表格形式显示的安卓界面布局通用属性:
| 序号 | 属性名 | 描述 |
|---|---|---|
| 1 | layout_width | 设置布局或控件的宽度。可以是具体尺寸、"wrap_content"或"match_parent"。 |
| 2 | layout_height | 设置布局或控件的高度。可以是具体尺寸、"wrap_content"或"match_parent"。 |
| 3 | layout_margin | 定义外边距,可以单独设置layout_marginLeft、layout_marginTop等。 |
| 4 | padding | 定义内边距,可以单独设置paddingLeft、paddingTop等。 |
| 5 | gravity | 决定控件在容器中的对齐方式,如居中、左对齐等。 |
| 6 | layout_gravity | 用于LinearLayout和FrameLayout,指定控件在父容器中的对齐方式。 |
| 7 | android:id | 为布局或控件设置唯一标识,以便在Java代码中引用。 |
| 8 | android:layout_centerHorizontal | 在RelativeLayout中使用,控制控件是否在水平方向上居中。 |
| 9 | android:layout_centerVertical | 在RelativeLayout中使用,控制控件是否在垂直方向上居中。 |
| 10 | layout_weight | 在线性布局中使用,决定控件在容器中分配剩余空间的比例。 |
| 11 | android:orientation | 线性布局的子控件排列方向,可以是"horizontal"或"vertical"。 |
请注意,这个表格是按照您给出的列表制作的,它反映了各个属性及其描述。在实际开发中,这些属性会应用在XML布局文件中,用于设计和调整用户界面的外观和行为。
❗️ 我是以XML和JAVA对安卓的布局进行编辑
四、线性布局
线性布局内的子控件通常被指定为水平或者竖直排序排列,通常使用
LinerLayout标签定义
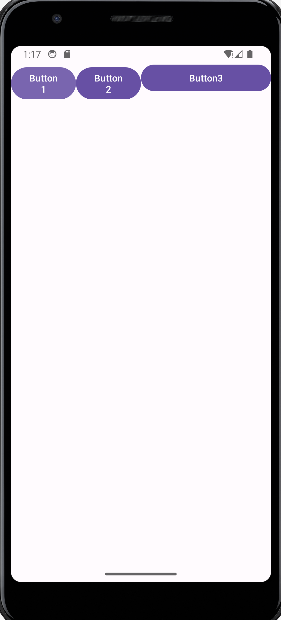
在xml文件中定义,以下我定义了是哪个按钮,他们的权重比为1:1:2
<?xml version="1.0" encoding="utf-8"?>
<LinearLayout xmlns:android="http://schemas.android.com/apk/res/android"
    android:id="@+id/test2" //在java Activiy文件中记得加上这个id
    android:layout_width="match_parent"
    android:layout_height="match_parent"
    android:orientation="horizontal"
    >
    <Button
        android:layout_width="0dp"
        android:layout_height="wrap_content"
        android:layout_weight="1"
        android:text="Button1"
        />
    <Button
        android:layout_width="0dp"
        android:layout_height="wrap_content"
        android:layout_weight="1"
        android:text="Button2"
        />
    <Button
        android:layout_width="0dp"
        android:layout_height="wrap_content"
        android:layout_weight="2"
        android:text="Button3"
        />
</LinearLayout>
在java代码中需要修改 findViewById为xml文件中定义的id
package com.example.android_test2;

import android.os.Bundle;

import androidx.activity.EdgeToEdge;
import androidx.appcompat.app.AppCompatActivity;
import androidx.core.graphics.Insets;
import androidx.core.view.ViewCompat;
import androidx.core.view.WindowInsetsCompat;

public class MainActivity extends AppCompatActivity {

    @Override
    protected void onCreate(Bundle savedInstanceState) {
        super.onCreate(savedInstanceState);
        EdgeToEdge.enable(this);
        setContentView(R.layout.activity_main);
        ViewCompat.setOnApplyWindowInsetsListener(findViewById(R.id.test2), (v, insets) -> {
            Insets systemBars = insets.getInsets(WindowInsetsCompat.Type.systemBars());
            v.setPadding(systemBars.left, systemBars.top, systemBars.right, systemBars.bottom);
            return insets;
        });
    }
}
显示效果
五、相对布局
相对布局通过对相对定位的方式来控制子控件的位置,使用
RelativeLayout标签来定义,它以父容器或者其他子控件为参照物,指定布局中子控件的位置,它由许多对于子控件的属性,指定子控件的位置
是的,我提供的表格并未涵盖所有RelativeLayout的属性。以下是一份更详细的表格,列出了RelativeLayout中子控件的一些常用属性:
| 序号 | 属性名 | 描述 |
|---|---|---|
| 1 | android:id |
为控件设置唯一标识,用于其他控件引用该控件时使用。 |
| 2 | android:layout_width |
设置控件的宽度。可以是具体尺寸、"wrap_content"或"match_parent"。 |
| 3 | android:layout_height |
设置控件的高度。可以是具体尺寸、"wrap_content"或"match_parent"。 |
| 4 | android:layout_centerHorizontal |
使控件在水平方向上相对于父元素居中对齐。 |
| 5 | android:layout_centerVertical |
使控件在垂直方向上相对于父元素居中对齐。 |
| 6 | android:layout_centerInParent |
使控件相对于父元素在水平和垂直方向上都居中。 |
| 7 | android:layout_alignParentLeft |
使控件的左边缘与父元素的左边缘对齐。 |
| 8 | android:layout_alignParentRight |
使控件的右边缘与父元素的右边缘对齐。 |
| 9 | android:layout_alignParentTop |
使控件的顶部边缘与父元素的顶部边缘对齐。 |
| 10 | android:layout_alignParentBottom |
使控件的底部边缘与父元素的底部边缘对齐。 |
| 11 | android:layout_alignBaseline |
使该控件的基线与给定ID的基线对齐。 |
| 12 | android:layout_alignTop |
使该控件的顶部边缘与给定ID的顶部边缘对齐。 |
| 13 | android:layout_alignBottom |
使该控件的底部边缘与给定ID的底部边缘对齐。 |
| 14 | android:layout_alignLeft |
使该控件的左边缘与给定ID的左边缘对齐。 |
| 15 | android:layout_alignRight |
使该控件的右边缘与给定ID的右边缘对齐。 |
| 16 | android:layout_alignStart |
(API 17+)使该控件的起始边缘与给定ID的起始边缘对齐。 |
| 17 | android:layout_alignEnd |
(API 17+)使该控件的结束边缘与给定ID的结束边缘对齐。 |
| 18 | android:layout_toLeftOf |
使该控件的右边缘与给定ID的左边缘对齐。 |
| 19 | android:layout_toRightOf |
使该控件的左边缘与给定ID的右边缘对齐。 |
| 20 | android:layout_below |
使该控件位于具有特定ID的控件下方。 |
| 21 | android:layout_above |
使该控件位于具有特定ID的控件上方。 |
| 22 | android:layout_toStartOf |
(API 17+)使该控件的结束边缘与给定ID的起始边缘对齐。 |
| 23 | android:layout_toEndOf |
(API 17+)使该控件的起始边缘与给定ID的结束边缘对齐。 |
这些属性使得RelativeLayout成为非常灵活且强大的布局管理器,它允许你通过简单的声明式语法来定义复杂的用户界面布局。请注意,随着Android API级别的提升,一些属性可能有所变更或者有了新的替代方案,比如 android:layout_alignStart和 android:layout_alignEnd是在API级别17(Android 4.2,Jelly Bean)引入的,用以取代 android:layout_alignLeft和 android:layout_alignRight。
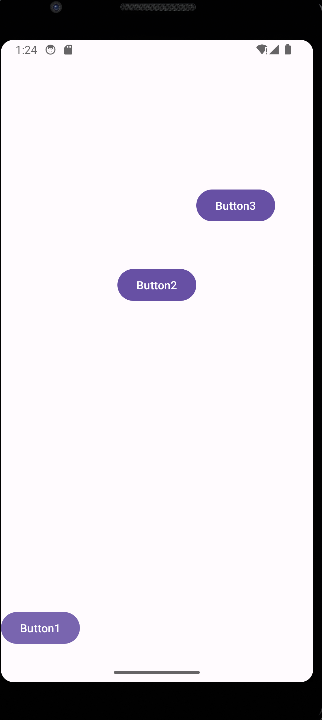
代码:
<?xml version="1.0" encoding="utf-8"?>
<RelativeLayout xmlns:android="http://schemas.android.com/apk/res/android"
    android:id="@+id/test3"
    android:layout_width="match_parent"
    android:layout_height="match_parent">
    <Button
        android:layout_width="wrap_content"
        android:layout_height="wrap_content"
        android:text="Button1"
        android:layout_alignParentLeft="true"
        android:layout_alignParentBottom="true"
        android:layout_marginBottom="20dp"/>
    <Button
        android:id="@+id/button2"
        android:layout_width="wrap_content"
        android:layout_height="wrap_content"
        android:text="Button2"
        android:layout_centerHorizontal="true"
        android:layout_marginTop="260dp" />
    <Button
        android:layout_width="wrap_content"
        android:layout_height="wrap_content"
        android:text="Button3"
        android:layout_marginBottom="100dp"
        android:layout_alignBottom="@id/button2"
        android:layout_toRightOf="@id/button2"/>
</RelativeLayout>
在java中修改id
findViewById(R.id.test3)
显示效果为:
六、表格布局
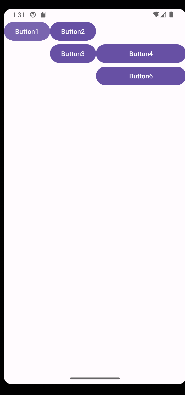
表格布局采用行和列的形式来管理控件,不需要声明由多少行和列,通过在表格布局中添加
TableRow来添加行,然后在 TableRow中来添加控件来控制列数
TableRow继承于LinearLayout,因此它完全支持LinearLayout的所有属性,此外还添加了其他常用的数据线
TableLayout 是 Android 中用于创建表格布局的容器,其常用属性主要用于定义行和列的划分以及子视图的对齐方式。下面是 TableLayout 的一些常用属性及其描述:
| 序号 | 属性名 | 描述 |
|---|---|---|
| 1 | android:stretchColumns |
设置哪些列应该被拉伸以填充额外的空间。可以指定一个或多个列(例如 "*", "1", "2")。 |
| 2 | android:shrinkColumns |
设置哪些列在空间不足时应该收缩。可以指定一个或多个列(例如 "*", "1", "2")。 |
| 3 | android:collapseColumns |
设置哪些整列应当在没有子视图时隐藏。可以指定一个或多个列(例如 "*", "1", "2")。 |
| 4 | android:layout_width |
设置 TableLayout 的宽度。可以是具体尺寸、"wrap_content" 或 "match_parent"。 |
| 5 | android:layout_height |
设置 TableLayout 的高度。可以是具体尺寸、"wrap_content" 或 "match_parent"。 |
| 6 | android:padding |
设置 TableLayout 内边距,影响子视图与其边缘的间距。 |
| 7 | android:gravity |
设置 TableLayout 中内容的整体对齐方式(如居中、左对齐、右对齐等)。 |
| 8 | android:divider |
在表格的行之间绘制分割线,可以是一个 drawable 资源或者一个颜色值。 |
| 9 | android:showDividers |
控制是否显示行或列的分隔符。可以设置为 none、middle、beginning、end 或 all。 |
这些属性通常在 XML 布局文件中声明,并可用于定制 TableLayout 的行为和外观。例如,你可以使用 android:stretchColumns="*" 来告诉 TableLayout 自动分配所有列的额外空间,或者使用 android:showDividers="middle" 来仅在行的中间部分显示分隔符。
代码:
<?xml version="1.0" encoding="utf-8"?>
<TableLayout xmlns:android="http://schemas.android.com/apk/res/android"
        android:id="@+id/TableLayoutTest"
    android:layout_width="wrap_content"
    android:layout_height="wrap_content"
    android:stretchColumns="2">
    <TableRow>
        <Button
            android:layout_width="wrap_content"
            android:layout_height="wrap_content"
            android:text="Button1"
            android:layout_column="0"
            />
        <Button
            android:layout_width="wrap_content"
            android:layout_height="wrap_content"
            android:text="Button2"
            android:layout_column="1"
            />
    </TableRow>
    <TableRow>
        <Button
            android:layout_width="wrap_content"
            android:layout_height="wrap_content"
            android:text="Button3"
            android:layout_column="1"
            />
        <Button
            android:layout_width="wrap_content"
            android:layout_height="wrap_content"
            android:text="Button4"
            android:layout_column="2"
            />
    </TableRow>
    <TableRow>
        <Button
            android:layout_width="wrap_content"
            android:layout_height="wrap_content"
            android:text="Button6"
            android:layout_column="2"
            />
    </TableRow>
</TableLayout>
java中修改id
findViewById(R.id.TableLayoutTest)
运行效果:
七、帧布局
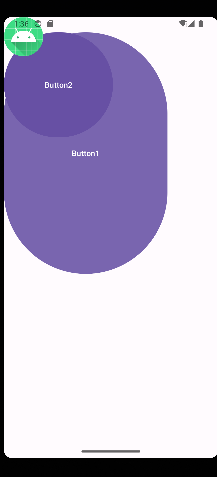
帧布局会在屏幕上创建一个空白的区域,添加到该区域的每个子控件占一帧,这些帧会一个一个叠加在一起,后加入的控件会叠加在一个控件上层,默认的情况下所有的控件会在左上角对齐,它通过
FrameLayout来配置
帧布局(FrameLayout)是 Android 中最简单的布局,它被设计为包含单个内容项,但也可以包含多个子元素,这些子元素会重叠在一起,堆叠在布局的左上角。以下是两个特殊的 FrameLayout 属性:
| 序号 | 属性名 | 描述 |
|---|---|---|
| 1 | android:foreground |
允许设置一个前景层,该前景层可以是一个Drawable资源或者一个视图。它会显示在 FrameLayout 的所有子视图之上。 |
| 2 | android:foregroundGravity |
设置前景层的对齐方式,如居中、左对齐或右对齐等。仅当 foreground 属性设置了内容时有效。 |
这两个属性是在 API 级别 23(Android 6.0 Marshmallow)引入的,它们主要用于在 FrameLayout 上添加一个覆盖物,例如一个加载指示器或者任何其他类型的浮动视图,而不会干扰 FrameLayout 中的子视图层级结构。
使用这些属性的 XML 示例可能如下所示:
<FrameLayout
    android:layout_width="match_parent"
    android:layout_height="match_parent">

    <!-- FrameLayout 的普通子视图 -->
    <TextView
        android:layout_width="wrap_content"
        android:layout_height="wrap_content"
        android:text="Hello World!" />

    <!-- 作为前景层添加的视图 -->
    <View
        android:id="@+id/my_foreground_view"
        android:layout_width="50dp"
        android:layout_height="50dp"
        android:background="@android:color/holo_blue_light"
        android:foregroundGravity="center" />

</FrameLayout>
在上面的例子中,my_foreground_view 将作为一个前景层显示在 FrameLayout 的所有子视图之上,并且根据 android:foregroundGravity 属性的值进行定位。
代码:
<?xml version="1.0" encoding="utf-8"?>
<FrameLayout xmlns:android="http://schemas.android.com/apk/res/android"
    android:layout_height="match_parent"
    android:layout_width="match_parent"
    android:foreground="@mipmap/ic_launcher"
    android:foregroundGravity="left"
    android:id="@+id/FrameLayoutTest">
    <Button
        android:layout_width="300dp"
        android:layout_height="450dp"
        android:text="Button1"/>
    <Button
        android:layout_width="200dp"
        android:layout_height="200dp"
        android:text="Button2"/>
</FrameLayout>
在java中修改id
运行效果:
